I've gone off on a new tangent...no one who really knows me is surprised! I have to have a way to make my MG cabs into pendants, after all! So I got tired of the beaded bezels which take so long (although they look so pretty!) and joined a new group on FB for wire wrapping. I've done some basic wrapping, as you can see if you browse my blog or my Pinterest page, but nothing so detailed as this! Whether my arthritic hands can handle it is another story, though!
The group, Wire Wrap Tips & Tutorials, is run by a lady named Nicole Hanna, who makes some incredible wrapped jewelry and has some great tutorials for sale, as well as a few freebies she throws in once in a while on her group. She was actually having a sale when I joined, and I couldn't help but buy several of her tutorials! One of them that I really like and doesn't take TOO long to make is a clasp that I loved - actually decided to learn to make Viking Knit to do justice to the clasp! :D I've tried Viking knit before but it never came out that great and I wasn't too thrilled with the whole process...but, it's not too difficult and goes faster than you'd think...I am still trying to get the stitches even. Once you run it through the reducing thingy though, a lot of your mistakes and unevenness just blend in...And to me, it's actually a little faster than beading....
 |
| This was the first one I made, so it is very small..a child could wear it. :D |
To make Viking knit, you loop lengths of wire around a dowel or other tubular shape to make a sort of netted tube, and then you run it through a wood or plastic paddle type thing that has a succession of smaller and smaller holes. You pull your netted tube through the holes, starting at the largest and ending when it gets to the size you want. which compresses the weave and makes it more flexible, and longer and thinner. I was unsure how long it would be, after I completed it, so my first came up rather short! I understand that some folks just make as long a knitted tube as they can, when they have time, and cut it in parts later...some use shorter ones for earrings or multiple small sections for bracelets, which looks GREAT. It is hard to do colored wire though because the paddle tends to rub the colored coating off. UPDATE:
Nicole has a channel/tutorial on Youtube to teach this technique...along with many others! Here is the link to her video on Viking knit and you can subscribe there as well.
 |
| I didn't compress this one much so I filled it with turquoise chips. I made the clasp using the tutorial by Nicole Hanna. |
There is a way to make the weaving more dense by weaving back over the original netting but I can't do that one yet! It's very confusing to me when I try and I get lost. Maybe as time goes on and I get better at this I'll figure it out! If you have any helpful tips on double or triple knit, let me know!
 |
| I wanted a thicker tube this time so I added more wire to make it longer before reducing and reduced it less. |
This is my first copper one. I had a hard time finding copper that was not coated so I could put a patina on it. I used 24 gauge wire, which is pretty thick for this technique! It's very hard on the hands to pull it tight and make the loops. I'll probably stick to a thinner, more easily bendable gauge of wire in the future!
 |
| This is the bracelet before patina. Learned how to make my own end caps for these bracelets finally! |
I haven't bought any patina yet, but I had a bottle of Novacan Black Patina on hand from when I did stained glass, and decided to try it on my copper bracelet and it worked great...especially considering it is at
least six years old!
 |
| Here it is with patina. I found out the first wire I used to make the end cap did not take the patina at all so I had to make another set with different wire. |
One thing that's very cool about Viking knit is how forgiving it is...my loops are awkward, out of line and all different sizes...but once you pull it through the paddle, it all evens out!
 |
| One more shot of my bracelet. I love how it came out! |
I am on a Viking Knit group on Facebook, too, and one of my fellow group members came up with a wonderful idea using paper clips and a rubberband to start the knit. Usually you make a daisy petal kind of thing with wire and add your copper or silver wire to it for your VK, then cut the daisy off. Welll,,, I am kind of a cheapskate and didn't want to make a wire thing every time and toss out all that wire. So using my group members idea, I adapted it to make a gizmo that works to get me started. I didn't have any paperclips, so I made my own out of stiff copper wire. (Probably the stuff that wouldn't take the patina above!) And I had seen someplace online how someone was using a hex key to hold their VK. I happened to have one just exactly like hers, and went to work!
 |
| Here is the hex key. It IS a little heavy. There are different sizes of these things, though...we have a whole set. I imagine you could use smaller ones to get a smaller tube...though it would be hard! Forgive my awful weaving! |
The hex key I am using has an indentation around the long end that the "doohickey" I made from stiff wire fits into perfectly, as you can see below. The hex key has six sides, which is also helpful for eyeing your loops and keeping them more even (do as I say and not as I do! I can NOT get the hang of making those loops even! I did see a video online where he takes pliers after every round and straightens up the loops...gonna try that next time!)
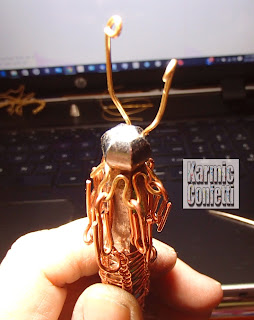 |
| The loops sticking out of the top belong to my homemade doohickey, I use them to fasten it to the hex key.. The loops drooping down below the hex key top are the doohickey's loops I hang my homemade paper clips on. Then below the paper clips, above my thumb, you can see the actual Viking knit that I made into the copper bracelet above. Notice the clips are all facing the same way... |
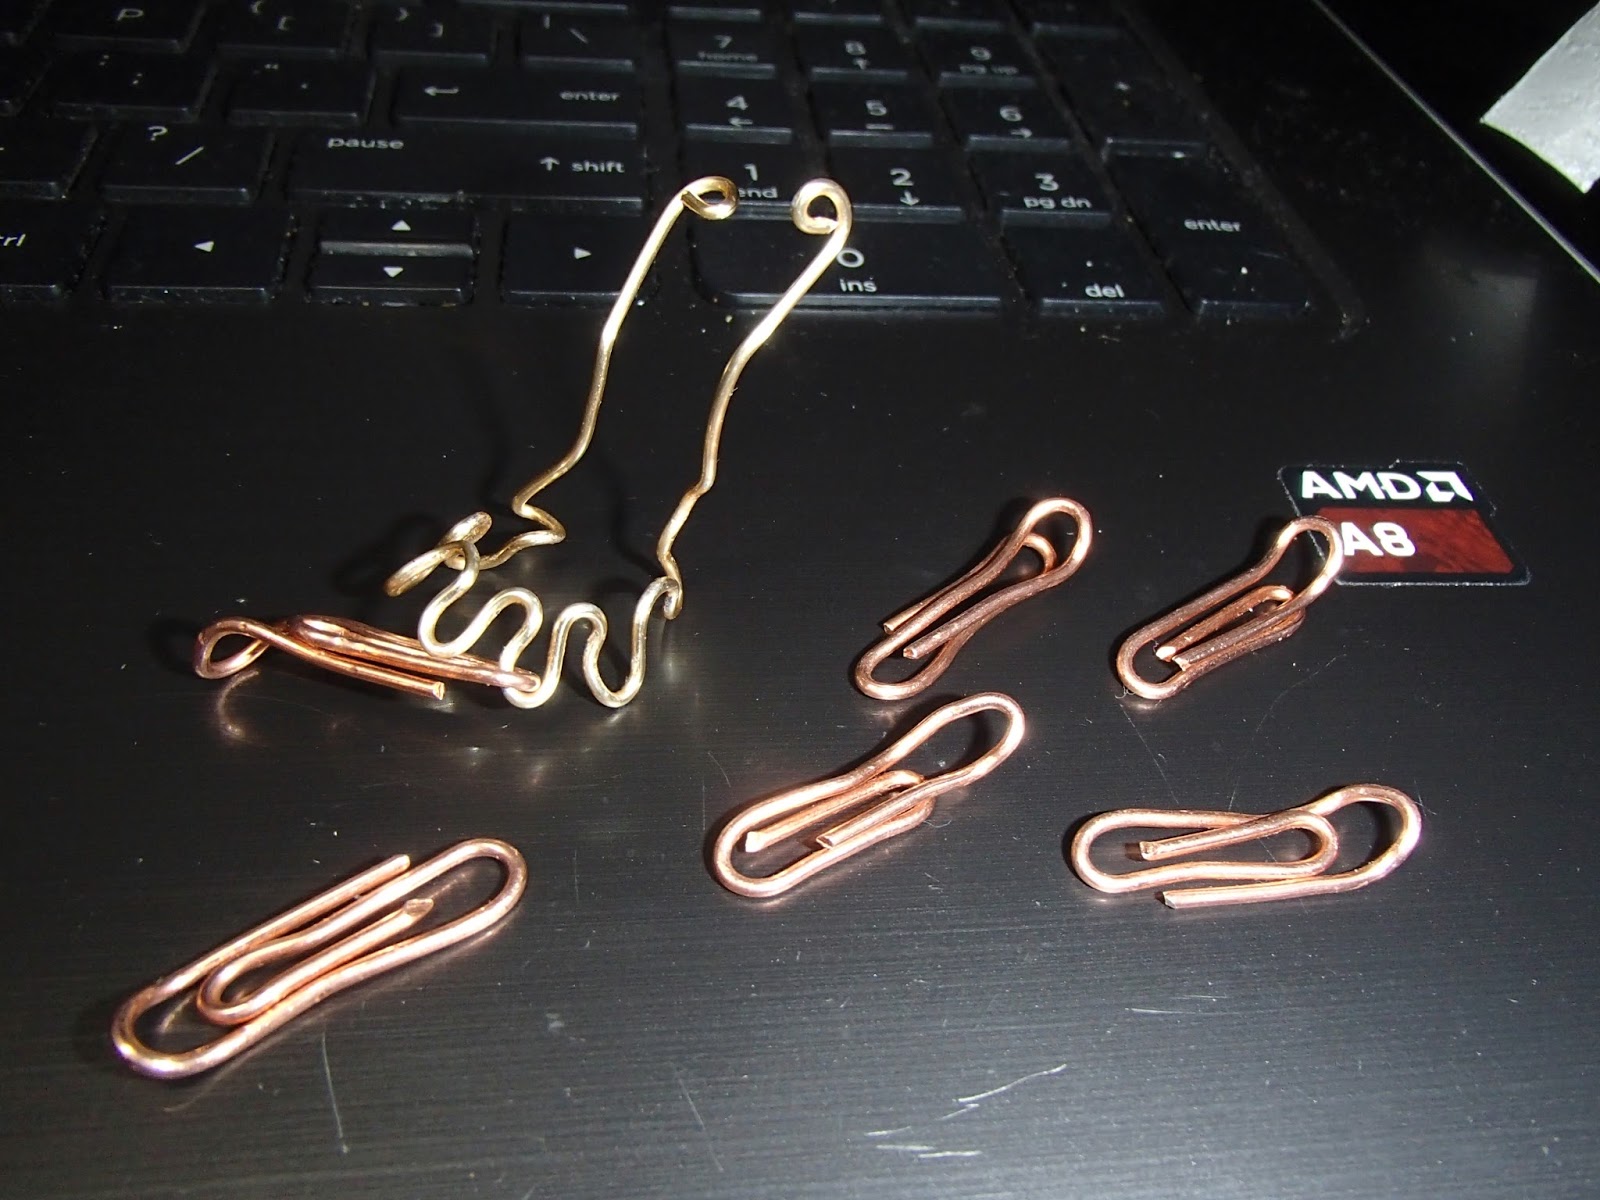
Below you can see my homemade paper clips and my doohickey. :) I made it with round nose pliers and some stiff wire. The loops sticking up are to fasten it sort of like a safety pin in that I can open and close to put it on the hex key...the loop from one side (sticking up) hooks into the other side and makes a complete circle. This is not a tutorial but you can hopefully see how I made it here.
 |
| I bent the paperclips end to make it easier to placing the knitting wire on for the first round. I put them on the doohickey all facing the same way, with the outer pointed end UP so I can slip them off the weaving after it is stiff enough to hold onto the hex key by itself. |
That's about all I have to say about my doohickey and VK...other than that you might like to try making one of your own if you like to Viking knit. It isn't permanent but if it breaks you can always make another. :)
Viking knit isn't the ONLY thing I've been doing. I have been learning a lot of techniques for wire weaving from various sites on the internet, and one I've learned a lot from is CSL Designs on Youtube. The woven bracelet is from a tutorial she taught. Love her accent, too!
 |
| Just a simple clasp on this one...mostly because it got kind of big! :D |
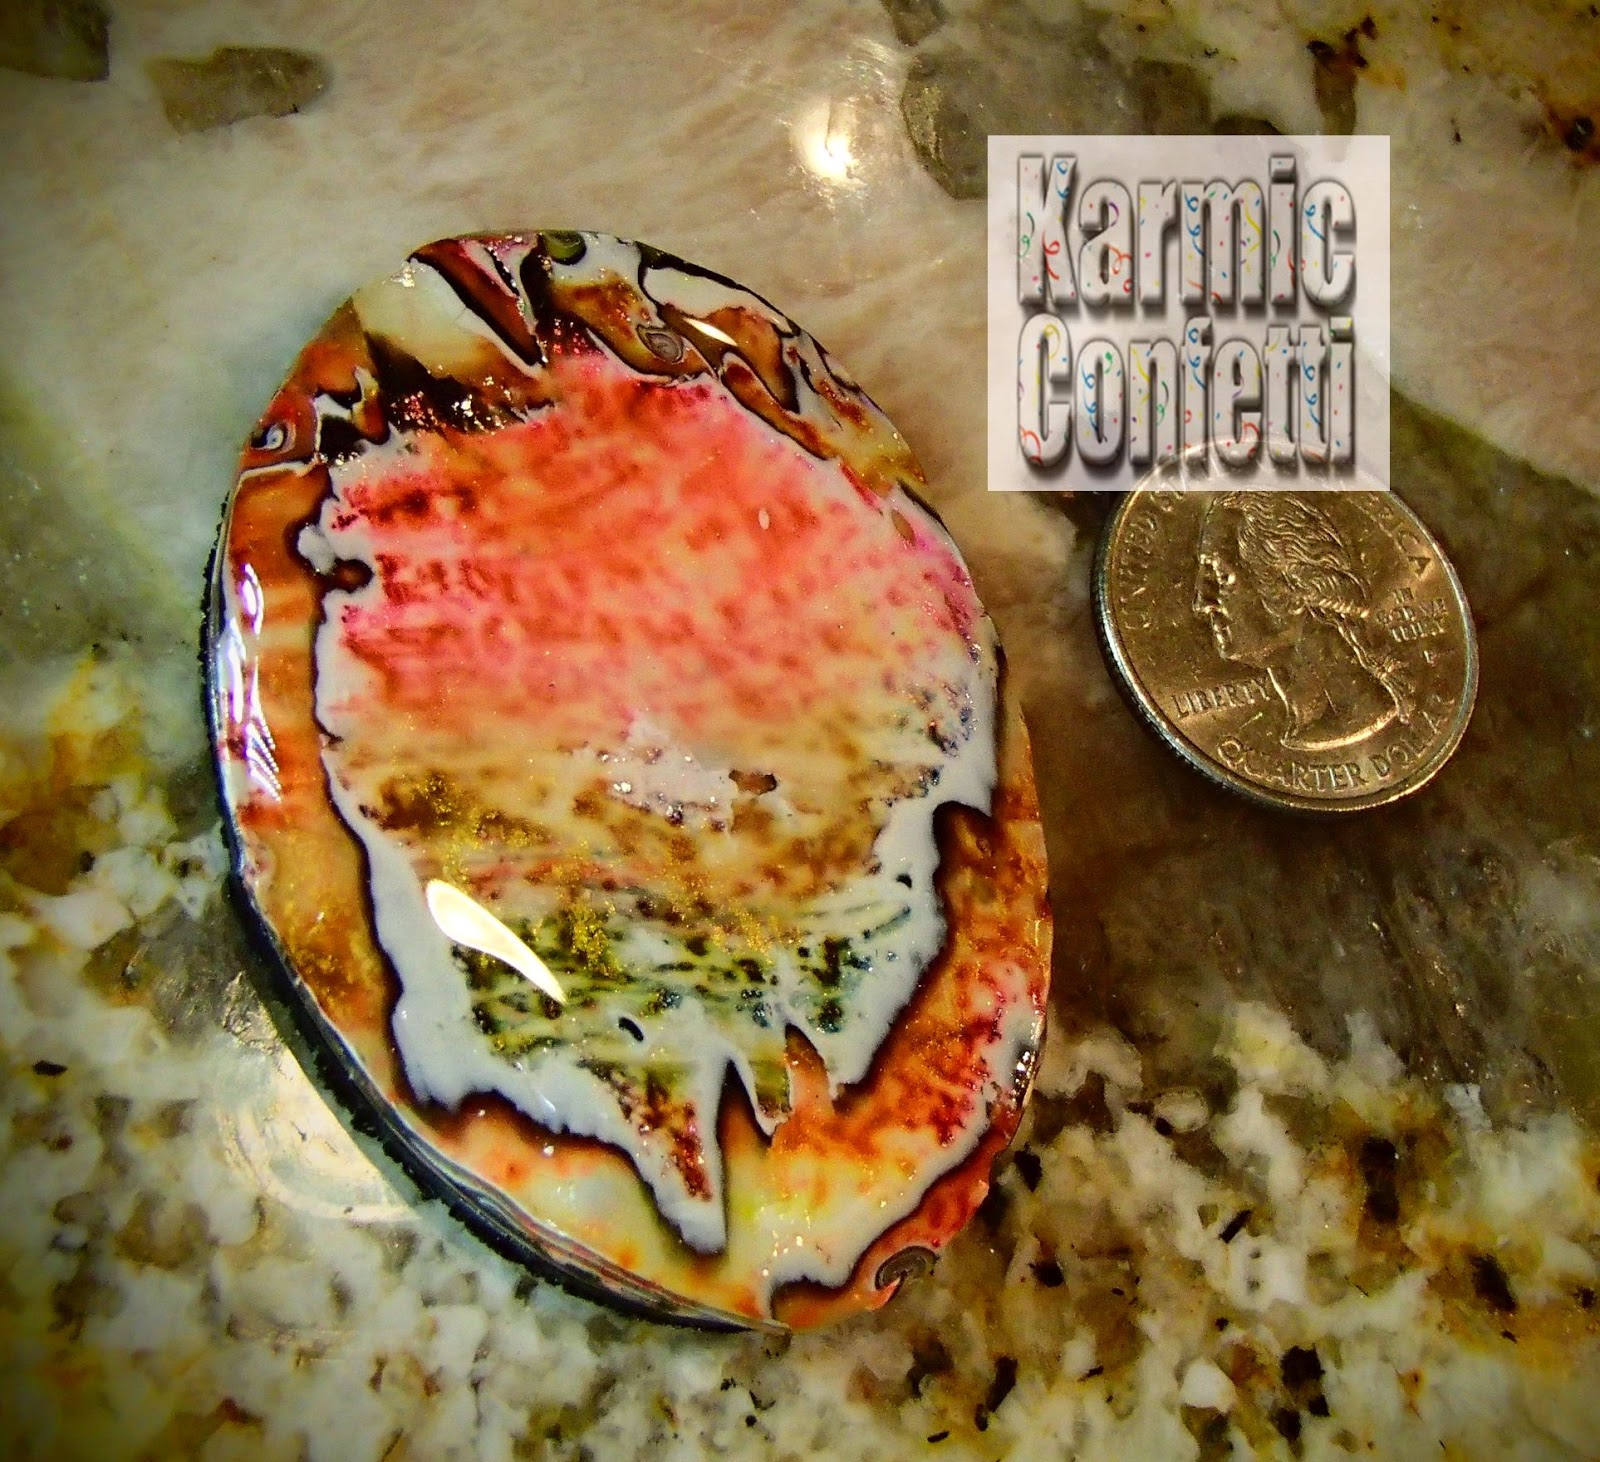
This cross is based on one of Nicole Hanna's tutorials. It is pink coated copper wire with a glass bead.
Then I cheated a bit by just drilling a hole in some of my cabs and using a pinch bail. :)
 |
| This is a five strand braided bezel on one of my Mokume Gane pendants (based on Marilyn's tutorial, of course!)...I got this bezel tutorial from CSL Designs again! She has such great ideas..... |
The agate donut below I've had for ages. I got a tutorial from
Shaktipa Designs that I had seen someone on one of my groups use and I had to purchase it! My rendition leaves a LOT to be desired though! It's a first try, what do you expect? :D Turns out it was my second purchase from her; I had also purchased her Soutache tutorial, too!
 |
| This bail was patina'd. |
I also did SOME beading recently, with the other donuts that I've had forever! This time I used some Super Duo beads I got at a local beading store...they just aren't available near me! #SupportLocalShops I saw a bracelet someone made with Super Duos on one of my groups and thought it would be perfect for a bail.
 |
| This one is beaded with Super Duo beads. |
 |
| This one was beaded with Twin beads. I like the Super Duos better but the copper are the only color I have and I wanted to see how these did...:) Not that great, lol! |
And last, but not least, here's another necklace I completed recently. It is one of my favorite Mokume Gane polymer clay cabs, wrapped in satin brass wire. Brass is very difficult to wire wrap with, and let me tell you, my poor hands know all about it! :) I found the tutorial to wrap the cab online at CLS Designs...love her stuff! I think, now that I know how, I have to go make some end caps for this necklace! Cya! If you have any questions about anything, leave me a comment!
Now you know what I've been doing lately! Let me know what you think in the comments! And make sure to stop by my Pinterest page to see a lot more of my creations, and please give my Facebook page, Karmic Confetti, a like - I just need a few more to reach 100!