Showing posts with label clay reducing. Show all posts

Wednesday, July 22, 2015

Fake Gold (Polymer Clay)

I have mentioned before that I am subscribed to Meg Newberg's polymer clay tutorials. I have made a few canes based on her tutorials so far and have been wanting to try her technique to make plain non metallic/mica clay look like shining gold metal via color. I was waiting for a good clay sale to get the colors necessary, finally finished up a few other projects and had a chance to try it. It was another gift I made for my aunts. I can't divulge the technique because these are paid tutorials but I am allowed to show the results! I can't say that they are fantastic but I was pretty happy with it for a first try. Meg not only shows you the techniques, she shows you how to use them and gives examples to try. I had this glass from a thrift store ages ago and loved the black. It had some engraving on it but I covered it in clay.


There was a lot of blending colors and cane making involved, which means a lot of pasta machine rolling! I would never have come up with this idea on my own, that's for sure! I rolled a few of the canes the wrong way but that was my own fault! The project still came out pretty much the way I intended!


I think I got a little too small on this butterfly's wing cane. I embedded wire into the butterfly heads for their antenna and then spiraled the ends. 


The other side of the bottom. I made a cane of the leaves, as well.


Another side of the glass.


The shine on the clay is Sculpey gloss varnish. These are not for drinking. I suggested they fill it with flowers. I really loved this red butterfly. And I liked the way that one tendril right below the blue one's wing is lighter at the end, like gold would do in the light...that is the technique that I was trying to explain!


'Scuse the flash but this is the only picture of the entire glass that came out well. :) They really liked it.


I still had (and have!) a lot of the various canes from the glass project on hand so I decided to try putting the clay on a large Christmas ball. It looks more like a Spring ball than a Christmas one! 
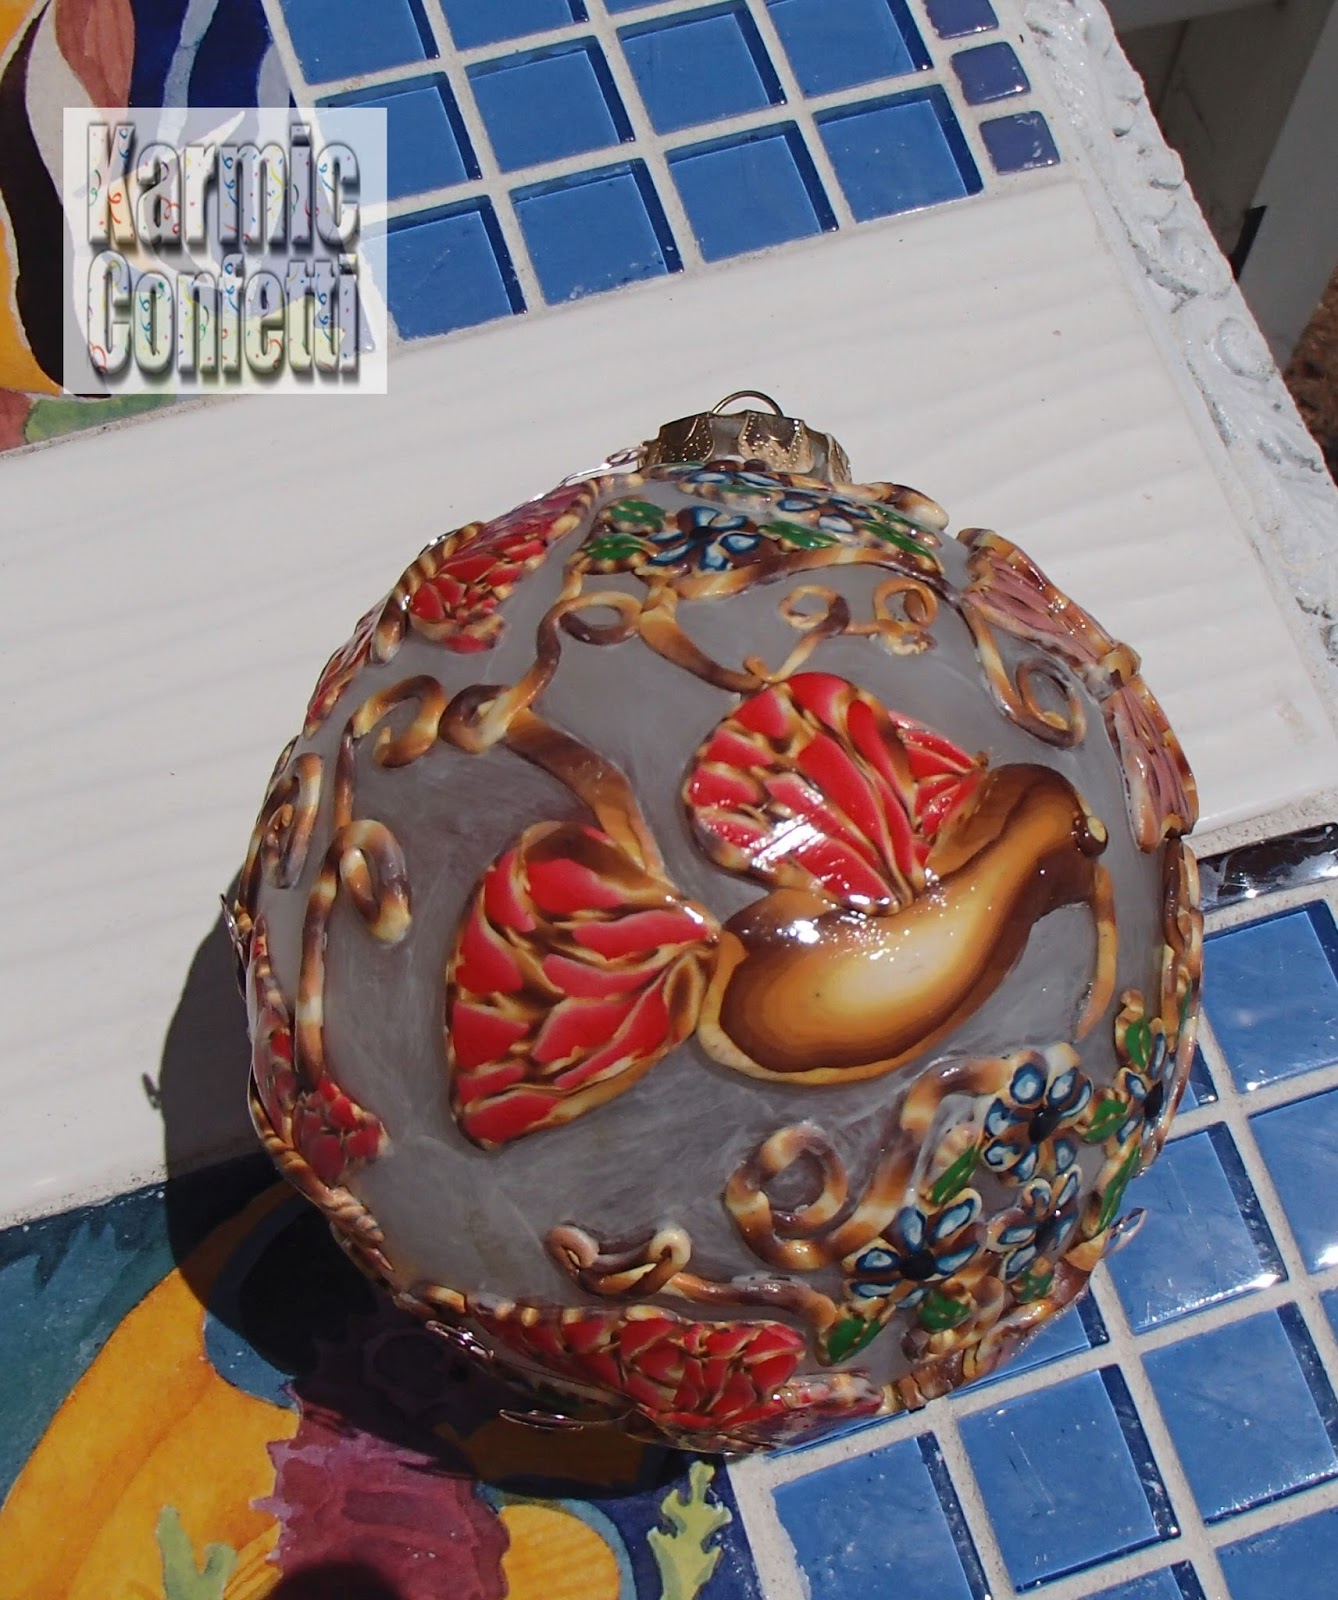


I didn't know how to color the glass and didn't want to leave it natural so I used some faux etching paint...they call it "Frost" paint. It looks pretty good and no nasty chemicals...If I were smart, I probably would've coated the INSIDE with something...oh well. :D


I probably should have painted it before I put the clay on but sometimes I do things and THEN think about it...learn from my mistakes, like I always do! :D


I used Sculpey gloss again to coat the clay after baking. 


Can't wait to see it on the tree. :) I think it will look nice with Christmas lights shining through.


The directions for the paint said to wait several days before baking. Luckily the curing temperature was the same as the clay for about the same length of time, so it was perfect for this project. In reality I normally would cook the clay a little longer but the pieces were thin and 1/2 hour was fine. 


I already have a vase that I coated with the faux etching in preparation to use up the last of my canes.  :)  Thanks for looking - make sure to stop by my Pinterest page to see a lot more of my creations, and please like my Facebook page, Karmic Confetti

Monday, April 6, 2015

Homemade Polymer Clay Slicing Gizmo for about $10!

Well, I am VERY excited. I've been thinking about making my own slicer for a few weeks now. I had seen a beautiful one made from lucite stamping blocks and a ruled lucite sheet, which I sort of based my idea on. I couldn't find the lucite blocks cheaply that were large enough and my basic idea was to make a U-shaped open ended box like shape that would hold the slicing blade perpendicular to the cutting surface and make it easy to slide the clay canes back and forth. 

We've got some home projects going on and so I was putzing around Home Depot the other day and saw these things called "tie plates" meant to tie wood planks and the like together. basically a large sturdy metal plate with holes to drill through to attach it to the project. I realize that could be a strong base so I bought a couple - they were inexpensive, under $2. I got two different sizes, too. Next, I need the uprights to hold the blade straight up and down. I decided shelf brackets would do the job. Sorry that I don't have a separate picture of them but I had already attached them by the time I decided this was going to work! I originally thought I would screw them down to the holes in the tie plate but then the screws would have gotten in the way, and the holes didn't line up right either. So duct tape to the rescue!

Below you can see the ingredients and the ugly base. I used my favorite Gorilla duct tape to attach the four shelf brackets to the bottom plate, but you could probably use silicone caulk or hot glue, too.  I think this is actually stronger, though! You can see that mess in the second picture. I taped the brackets to each other and then to the plate. It doesn't sit completely flat but it doesn't matter....

The bottom plate I chose because I was going to use a 4" tile to put the clay canes on and that was a good size, but I ended up going a different way. In the photo below you can see the pre-cut sheet metal I ended up using instead. Much lighter in weight, cuts with sturdy scissors and slides nicely over the metal tie plate. You also get ten sheets in the package so you can make more than one for your clay slicer. There is no reason you couldn't bake on these sheets, or use them to store clay on. I also included in the photo a couple other sizes of tie plates, so you can see you aren't limited by the size I got. The shelf brackets can be purchased in other sizes, too.  And you can buy a big roll of sheet metal, if you think you're going to use a lot of it! I love that stuff...:) I use these pre-cut ones a lot. They are a little thicker than a soda can and die cut, cut, and emboss nicely.


I began by taping the four brackets to the base. I overlapped the brackets so they'd fit tightly against the sides of the tie plate base and then taped them to it, leaving a thin gap between each of the side brackets so I could fit my clay blade in there. (Shown below on its side. It's really not pretty under there!) I was going to use my regular Sculpey blade but then I had an idea to use the sheet metal to make a NEW blade. This turned out to be a brilliant idea! :) It makes the blade taut, is actually a bit sharper than my old blade, and kind of holds everything tight while slicing.  I just used the slice I cut off to make the bottom fit the tie plate with some metal scissors I have, and used some round nosed pliers to make round ends to both hold it with and slide up and down in the contraption. (See the bottom picture.) You can adjust those rounded ends to make it hold tight in your own clay cutting gizmo.


So, to use this thing, you put the clay on the metal sheet, which I cut to fit tightly on top of the tie plate base and between the shelf brackets. It slides easily back and forth so you can slice the cane. I could've/should've gotten all the same size shelf brackets but I went this way instead. :) It's all tight enough that, as you can see in the photo, it holds the blade up until you press it down. I can also still use my Sculpey clay blade if I wish, or the rippled one, etc. No measurements, but you can eye it out, right? Or if you have ADD, you can use a scribe and a ruler to make markings of your own on the soft aluminum. And you can use a larger plate to make yours, if you need one (as seen in the picture at the top), since you are making your own blade with the sheet metal and it can be longer, if you wish! This one is good for me, though. :) I bet you could even make your own rippled blade if you have a decent metal paper crimper...:)

It's not even THAT ugly! Kind of industrial looking. You could even decorate it with clay if you want it prettier!  And of course, the best part is it was CHEAP. The package of 10 pre-cut sheets of sheet metal was under  $3. The metal tie plate was around $2. The brackets were the most expensive part and I am sure I could have gotten them cheaper! The two thinner ones were under two and the other bigger ones were a couple of dollars more because I got them in a different area and didn't realize how much more they were...Anywho, this thing cost about ten dollars! With lots of left over sheet metal...I have another project I'm going to share soon that will show you some other creative ideas to use those for! :)

In case I haven't explained it well...The picture above shows the rounded ends of the metal blade I made, slipped between the shelf brackets on the right and left. The shiny sheet metal on the bottom is where you put your clay, and it slides back and forth on the bottom tie plate. There is no way to cut a round cane, yet, but I'm working on it! I thought about using the Playdough again but it's not stiff enough to really support the cane so it will keep its shape. 

I hope this gives you some ideas, at least, and if you decide to make one or have any questions or tips about this one, let me know! Thanks for looking. and make sure to stop by my Pinterest page to see a lot more of my creations, and like my Facebook page, Karmic Confetti

Sunday, April 5, 2015

Polymer Clay and Play Dough Reduction

I am a subscriber of Meg Newberg's tutorials. They are extremely well written and she keeps coming up with such novel and beautiful ideas! I wanted to try her latest, which looks like beveled glass....if you join this month you'll get the issue for $5...if you wait the price goes up for individual back issues. (As always, I do not receive any money from mentioning other artists. I am just informing you what I like!) Here is a link to her Etsy site.  You really should go visit and see her wonderful tutorials! They are unlike any I've seen! Very talented lady.

Anyway, the cane in the latest issue comes out shaped like a six pointed star, so I decided to try a technique I read about on the internet where you use Playdough to wrap your clay before reducing odd shaped canes. Supposedly it peels right off afterwards. I decided to give it a try so I wouldn't deform my hard work! This is not an easy cane to make or reduce!

I haven't used this stuff since I was six! It seems better than it was back then...it doesn't have that odor we all remember anymore! :) It always smelled toxic to me, although it was supposed to be safe. I guess it was okay since I'm still here! The formula they use now seems smoother, as well, rather slippery and better than it was when I was little.

This picture shows my cane covered in a thin layer of pink Playdough. It is very soft so it can't be used  alone. I rolled it out by hand and maybe I should have made it thinner. 


Then I filled in the low spots with triangles of red scrap polymer clay I had already open and conditioned. I believe all the polymer here is Primo.


Then I covered the whole thing in another sheet of the red scrap. The idea is that the Playdough peels off the cane cleanly and the extra red I added helps it keep its shape while reducing....Since your cane is now round, you can do a bit of rolling to reduce it. Much easier to reduce than a six pointed star!


Then, my usual technique is to attach the ends to either a lucite block for stamping (couldn't find it for the pic) or a piece of plastic....this one is one I cut off from the package eraser clay packs comes in. I have already started reducing it in this photo. As you can see, the soft Playdough squished out and made a big mess. If my beginning layer of it was thinner, it might not have gotten so icky. :) Another tip that works very well is to add some scrap clay to the end of your cane before reducing. Then you don't lose so much of your "good" cane. I didn't do it, in this case.


I did not take a photo of the results because I didn't want anyone to lose their lunch....It was ugly. The Playdough did NOT peel off easily, as I was told! I ended up peeling what I could of the scrap red off, then as much of the icky Playdough off both the cane and the scrap clay, and gently washing off the rest. It DID work, but it wasn't what I had hoped for....It was messy and nasty once it got wet....but it did all rinse off after a bit of soaking in warm water. If you try this, I suggest you make your cane as smooth as possible before putting on the layer of Playdough...it wants to get in any crevices and stick. A toothbrush got it out though. If you baked it with some on the outside, I am sure it would just dry out and fall off.. So, your mileage may vary. Will I do this again? Maybe. It DID work, and Playdough is cheap.


Not really sure about how this cane came out but it was my first attempt. We are our own worst critics, though...we see every mistake glaring like the sun!  I'll still probably make something out of it...hardly ever any waste in polymer clay! Hope you enjoyed my experiment and come back and see what else I'm up to soon!