Showing posts with label patina. Show all posts

Thursday, May 19, 2016

More about K-etching Up - Electro-etching Copper

I had forgotten about using embossing powder with my etching and decided to try etching with my electric device with it to see if it stayed on longer. It sure did! It was perfect - none of it came off during the etching process! But the powder I used was rather chunky...couldn't find my detail powder for this attempt so I'll have to go hunting for it soon! I lost a lot of the detail because the embossing powder was a little too thick. Or maybe a little too much Versamark ink....

This is how it looked after I melted some sparkly embossing powder on it.
I set up my device like last time and let it go for over an hour this time, checking it periodically. I had to add some more salt because it didn't seem like it was etching much, and it did help.


This is after etching, fresh out of the container. I wanted to show how deep the etch was.
It's a little hard to tell the depth because of how thick the embossing powder is but I was happy!
Then I tried to get the embossing powder off. In another post I was told lacquer thinner would do the trick but all I have is some nail polish remover. It didn't exactly remove it, although some came off and it got kind of brittle. I then found a straight razor blade and used it to scrape the embossing powder off...it came off in big sheets, as you can see from the picture! Whole flowers and lace...it was much easier than trying to remove it with the nail polish remover, I gotta say!
You can see entire embossing powder flowers on the paper plate, to the right.

This is after scraping off the embossing powder, before sanding. It lost some of the detail in the stamp, but I'll do better next time. It was so shiny on the unetched parts!

After sanding, before patina. Very happy with the depth of the etch! 
Glad to know that using embossing powder works SO well! Next time I will find my detail powder, I think it will do a better job of keeping the fine detail in my stamped etchings.

After patina.
For instance...the detail on this one...!
This is the other side of the sheet of copper I just showed you.
The picture above is the result of the last time I etched with my electrical device, using the Stazon ink. If the ink hadn't come off, it would have been an amazing etch! The detail in it is perfect! Maybe when I find my detail powder it will look as nice. But you can see how shallow the etching is...the ink was coming off so fast I just stopped my experiment. But it is still very pretty. :)

I used a different embossing powder for the one below, a gold detail powder, and it wasn't as easy to remove as the glittery, crusty one was. It did, however, give a much more detailed result. It did come off, with some elbow grease, with the nail polish remover...and a razor blade. I guess it depends on the brand. I am much happier with this etch, even if I didn't stamp it perfectly. :) The embossing powder worked MUCH better than the plain ink using the electrolytic etch! It held perfectly onto the metal. I still have to test my setup with some PnP but for now, this is a great substitute.
The edges are rounded, but sharp. It's quite deep!
This final picture is of a piece of my aluminum sheet metal that I tried to etch. In one of the sites I read they said you could etch aluminum with this electric method, so I decided to try it with the embossing powders. I used a Zing purple detail powder on it and let it go in my setup for about an hour and a half. At first I tried using my scrap copper but didn't see any reaction so I changed it to a piece of the sheetmetal. There was some kind of aluminum colored jelly on top of the copper residue (didnt wash out the container very well) after etching for that long and I got worried about some kind of poison gas being released by this so I stopped it. Better safe than sorry! I tried using nailpolish remover on the embossing powder and all it did was remove the purple dye :) so I scraped the melted powder off with my razor blade....you can see the scratch marks in the picture. It does not look actually "etched"...the exposed parts look more "deteriorated" than etched. :D But it still looks kind of cool, right? Thus ends this experiment! :)
Too bad I scratched it up! I may try using a colored pencil on it...
Please follow me here, or on Facebook and Pinterest! Thanks for looking and I'll see you again soon!


Saturday, May 14, 2016

K-etching Up - Etching Copper

I haven't posted in a while because after Christmas cards (another post!) I took a break...I was working with resin a lot before that and it was too cold in my house to use it. I've been doing other things, like some wire wrapping but haven't made much other wise. Then in March I had some health issues and so things are still not back to the way they were...but I am slowly getting better and getting back to making stuff. Mostly wire wrapping cabs I already made, but wanted to do some more etching too...

So I started etching copper sheeting and thought I'd share the results again. You can read about my previous experiences (with hydrogen peroxide, salt and vinegar, even!) on a couple of previous posts...links to them should be on the right side of this page, at least on a computer! I've tried all the different ways I know of, now, except using PnP paper...which, apparently, is the only way you can get a good etch on copper with saltwater and electricity! Although mine wasn't entirely a waste of time! You be the judge!

If you've followed this blog, you know I am a relative newbie to etching, so I decided to try some techniques from other blogs. The first one was this Insructable, where they explained how to use a soft roller and a baggie - and which only uses about an ounce of ferric chloride for your etching project! Since I had only gotten two uses from my last $13 bottle of it, I decided to give it a try and was very pleased with the results. It is not a DEEP etch but was really nice. I will definitely get a lot more uses out of the etching solution this way! (Sidenote: Found a great way to dispose of the old solution quickly: I put some scrap aluminum sheet (leftover from my other projects, sheet metal from Home Depot, 10 5"x7" sheets for less than $3) in the container with the used solution and it solidified overnight! I would still take it to a disposal site but it is much easier to transport!)
Here are my supplies...baggies, foam paint roller, ferric chloride, copper...The two sheets on the left are thinner metal than the one on the right. Somewhere is the lemonade Kool-aid I used to make my Edinburgh etch..couldn't find citric acid. :)
I have learned from other blogs that it is a good idea to stamp your images and let them dry for over 24 hours, so I did that with the Stazon and a plain rubber stamp. I was worried about rubbing off the ink with the rolling action but it held up pretty well.,.although it came off very easily when I was done! I also used stickers and they held up well, too, surprisingly. The directions I followed on that Instructable are actually in the comments, not the main post! The main post was more about circuit boards but the post I used was by Mr. MM, about halfway down in the comments, the Edinburgh etch method. I did not have a soft rubber brayer but remembered my foam paint roller and used that to press the solution over the metal. It took about 45 mins total, probably half the normal time I did it last time I tried etching. The thinner metal took less time.

Freshly etched, no patina yet. These are the two thinner sheets.
What I did was double bag the pre-stamped metal sheet in heavy duty baggies (and I did get a leak, so do it over newspaper or plastic) with some Edinburgh etch solution and about an ounce of ferric chloride. Both sides of the metal were to be etched so I flipped it several times and rolled both sides. One side had rubber stamps and one side had stickers. I used detailed peel-off stickers and they worked quite well. They didn't come off, at least, even with all the rolling!

I rolled them for about 45 minutes and then took them out. 
You can see the stickers on this one. This one is the thicker metal. Yes, I got two uses out of the amount in the bag!

Below, you can see them patina'd. The one on the left was taken out about five minutes before the other one (I did them together as they both fit in the bag.) I do see a tiny difference. These were the thinner sheets I used to be able to get...I don't think Michael's sells these anymore. The thicker ones are from Hobby Lobby. The thinner ones took about 30 minutes...there was only one side to etch on these, though. 
After patina. You can tell it's a little less deep than my previous experiments. But very smooth etch!

Then I decided I wanted to try electrolytic etching. I basically used directions from this blog, but used my stamped copper with the Stazon and my own power supply. Not a great idea with the Stayzon, although it DID work...barely. PnP would be MUCH better! Or a paint pen...although I wanted to use my stamp. There is some discussion on the blog about what to do with the used solution; I'll get to my experience with that at the end....

A while back I purchased this car DC adapter and recently saw it in my garage and wondered if I could use it for electrolytic etching since you can adjust the voltage. I decided to give it a try after reading a few blogs about using similar items, although I couldn't find out about this specific one. I cut off the end, split the wire and used gator clips with screws to attach the stripped wire ends to.  
What a deal I got on this, huh! But you know it's old...they're talking about cd players!

As you can see, you can easily adjust the voltage, which was one reason I decided to try this.

After I prepared my DC adapter, I had to go find my AC adapter to plug it into so I could use it in the house. Lol! I got some Kosher salt and distilled water and mixed it till the salt wouldn't melt anymore, got some heavy duty copper wire to hang my metal from and hung the stamped sheet directly across from some scrap sheet in a large plastic container, then I clipped my alligator clips to the copper wires.  I looked online to see which side of the plug's split wire was the hot side and read that the side with the ridge was hot...but it was backwards once I plugged it all in...since I got bubbles on the side I was trying to etch! I think the Stazon would have lasted longer if I hadn't done that....I switched the clips and all was well. I sure held my breath when I plugged it in, though! :D

I set the adapter for 3 volts but I think I'll go to 4.5 next time. You can see the screwed on alligator clips attached to the wire holding up the copper sheeting in the container. I cut one wire on the adapter shorter so they will never touch each other accidentally.
Bubbles.....on the wrong side! There goes my Stazon...poo. I caught it pretty fast though, and switched the clips...

Here are the results. Not too bad, actually...! The first side pictured below is the one that had the peel off stickers. The top part in the picture was done with a stamp and Stazon. (You can see what this looks like before I etched it in the last picture on this post.) The second sticker on the second row fell off, so it wasn't etched well, but the rest held up long enough to etch satisfactorily. I may try to cut this into bracelets.

This is the second side, that was Stazon and stamp only. It isn't bad, although most of the stamping wore off prematurely. This is really one of my favorite stamps! 
So, now I am stuck with a bunch of orange crap in a soup of murky water! Is it salt? Copper? Both? It's poisonous to plants and animals...What to do?
Here's the water after a couple of days of settling. (I poured off the clear water before I took this photo.) LOTS of etched copper and excess salt! I would love to know if you could use this to electroplate with?
On the first blog, some one in the comments mentioned being able to put steel wool in the water and the steel would chemically attract the copper remnants. It worked a little but there was a LOT of copper in there. Maybe if I had added more steel wool,,,but I didn't have time for that! You can see one of the stickers that floated off...they really didn't work well with this electric method.
Here's what accumulated on the steel wool. It did seem to attract some...or maybe the orange was rust? I don't know....
What I ended up doing was pouring it through a coffee filter with a strainer and I'll reuse the still salty water. I'll probably hold onto the filtered out copper and see if i can melt it or use it some other way. Next on the agenda (and shopping list) is some PnP paper and a laminator to attach the PnP to the metal with. There seems to be some good information here about this! 

Thanks for looking and for being so patient! I will be back faster next time. :)

Here's a look at the sheets I etched, pre-etching, and where that scrap copper came from in the photos above...now, what to do with these domed disks? :)
Later!


Tuesday, November 10, 2015

F-etching results - More About Etching

Thought maybe you'd like to see what I did with the metal I etched the other day. If you haven't read the post it is the last one I wrote and it is also located on the right side of the page in the popular articles section. I have GOT to find a good source of cheap copper! The pieces I used spoiled me because all four sheets were $4.99 on clearance, down from $19.99. I wish I had bought more, now! (I do have two more packages I found in my stash that I am very happy about! I am saving them for when I do a laser print of a photograph...;) )  I hear that the world is actually running out of copper, though, so cheap copper may be a pipe dream!

I didn't have any "spare" copper that I wanted to use to back up these little experiments, though so I ended up using of my favorite metals - sheets of aluminum flashing that I get at Home Depot (10 5x7" sheets for less than $3!) to back them with. I colored them with some dark colors of alcohol ink to blend them in with the patina'd copper a bit. I tried making rivets from copper wire but had no luck, so I dug out my eyelets and my Big Bite to punch the metal out and set the eyelets. (I saw a package today of eyelets and grommets at the craft store - the grommets go on the back to stop the ragged edges on the back of eyelets when you set them - I have to find out more about them! If you want to use these for jewelry, it's a must to have a smooth back! The ones I saw were a little expensive but if you want quality sometimes you have to pay for it. ;)) I already had my coupon used for a new product I am going to use for Christmas cards this year...it's a foiling pen and looks so cool! More about that another time....
I found out that both the 34g copper and the aluminum flashing are thin enough to cut with a scrapbooking corner punch I have for making Christmas cards so I rounded the edges of both the copper and aluminum with it.
As I said, I tried to make my own rivets and messed up the upper corner of the mermaid, so I ended up using eyelets with it. Now I have something to hang it from though. I have some copper chain I can use. :)

I love the stamp I used to make this. I've used it with my fused glass, too. Oddly enough I ran across this exact same etching on another persons etching post. :)
 I decided to make a bracelet out of this thin strip. I cut it with some decorative scissors and gave it a scalloped edge so I backed it with aluminum to prevent sharp edges. It isn't very strong, being that it is backed with aluminum but I now have a prototype to make more. ;) You can't see it but once again I used eyelets to fasten the two strips together. It is quite comfortable to wear though.


I have had this stamp forever! It's a four sided one and I love all four. :D
Like I said, this isn't a perfect etch but it's really cute, isn't it? I would hang it on a Christmas tree. :) 

The etching on this actually looks better in person. Same design as the other bracelet with a Christmas theme! :)

Someone on one of my Facebook metal groups asked about the Ranger patina paints or inks that exist. I decided to try them on some old diecut embossed pieces of my aluminum flashing that were laying around. The brown one in the center is actually alcohol ink like I used on the pieces above. I sanded them with sme fine grit sandpaper once they were dry. There is a real shine to these inks. I did not use the gold that is in the set I have, yet.  Jury is still out on what I think of them on the kind of metals I create, though...I did see someone use them for etched copper earrings and they looked really nice.

These are not etched. They were run through my Big Kick with a few Vintage embossing plates.
In my search for cheap copper I ended up going to Ace Hardware. I wanted to see if they had wire anyway. I ended up getting a sheet of copper that was much thicker than the previous sheets I had worked with and cost about $8. However, I hadn't thought about the need to cut this bad boy! I am not sure what gauge it is but it said .025 on the package...I was told that was thin enough to cut with scissors but oh heck no...! Not my arthritic hands! But I was lucky enough to get a set of aviator snips - left right and straight - for about $7 a couple of years ago and went to town with them. I guess I could have used my jewelry saw but I am not a patient person! Maybe next time. I have found copper at Hobby Lobby and with a coupon it will be really inexpensive...at least cheaper than Ace. :)
I don't know if you can tell how hard this was to cut from this photo. I had to use a file to smooth the edges after this. I think I need to ask my husband to do this stuff for me at this point! :P
The next photo is after etching. I really love the way they came out! I decided to break down and went to Radio Shack for their ferric chloride etchant and used that instead this time because the copper is so much thicker. I got a cheap fish tank pump and taped it to the side of the container holding the ferric chloride so the vibration would help the etching and left it in the solution for about two and a half hours. I think I may add the citric acid to it and see if it etches better with it next time. Here are some notes I took from someone on Facebook about this topic...using citric acid along with FC. I wish I could give that person credit but I forgot to get their name! Anyway, the method using citric acid is called The Edinburgh Etch and is supposed to be safer than using plain old ferric chloride.

"Recipe for Citric Acid Etching Solution: Place 3/4 cup of warm water in a glass or plastic container that has a non-metallic lid (an old, clean, mayonnaise jar# works) and slowly add 1/4 cup of citric acid power. Stir until dissolved. That's it. You can't make Edinburgh Etch by just sprinkling citric acid powder into your ferric chloride, you have to dissolve it first. To make EE, add one cup of citric acid solution to four cups of ferric chloride and stir to make it homogenous. <snip> There are several videos-just search for Keith Howard. He was instrumental in encouraging the chemists at the U of Edinburgh to develop a safer etchant." Apparently Keith Howard wrote a book called Non-Toxic Printmaking with this recipe in it in the late 1980s or 90s

Before adding patina. I bought the Beadsmith stuff - what a waste of money! Turned really black and then completely fell off, leaving shiny metal behind! :P

This is from one of the other packages of the thin metal that I had in my stash. I left it in a little too long, I think! But it really kept a lot of detail. This is two different stamps, btw, in case you are wondering why the right and left seem so different! This one has finer details compared to the others. I used a Stazon stamp pad alone instead of using Versamark and embossing powder. It gave a much finer, more detailed etch.


The picture with the two sets of trees is for comparison. The one on the bottom is the original one I etched with my vinegar/peroxide/salt mixture. The top one is the ferric chloride. I left it in a little too long, trying to get a deepish etch, and it started eating a hole through the metal. I think I actually got a better etch with the first mixture! Maybe the ferric chloride is better for thicker items though... 

The top one is very thin and fragile now. ..These were both done with the same kind of metal to begin with, just the etchant was different...I also discovered I have to make sure to use detail embossing powder instead of whatever the heck I was using, because the tree branches are much thicker than they were in the first etch. Another tip I just discovered on my FB etching group is that if you use embossing powder to etch and are having a hard time removing it, and don't want to sand because your etch is too delicate, you can use lacquer thinner...great tip, because I could NOT find out that information anyplace! :D Many thanks to Ruth Shapiro! 

Still pretty. :)
And then, my favorite of the experiments! These are slices of a copper pipe I cut a few months back when I was making copper bezels for my polymer clay with them.  I rolled them in stamp pads and also used Sharpie to put simple designs on by hand. It wasn't even Sharpie, it was el cheapo red permanent marker from the Dollar Tree! Worked great...those are the ones with lines on them. I also used my Stazon stamp pad to edge all of the pipe slices as well as the flat pieces. (You edge them to protect the edge so it won't get etched and ragged from the etchant.) Seemed easier than using a Sharpie because my hand kept slipping when I tried. :D And it was! They were perfectly smooth after etching. You will see these again, and soon. :) Watch this page! 
Rolling them on my stamp pad was a pain! I put a dowel through them (I rolled them individually) and rolled them across the pad with it, but my hands were still quite black when I finished! :D
And here is my etched Ace Hardware copper plate. Very happy with these!  I have more planned for them, however, so stay tuned! :)


Thanks for visiting and check back often. I have a new project in the works with RESIN that I am SO excited about! Come back soon now, y'hear? :D


Tuesday, September 1, 2015

Did Vikings Really Knit? - Wire Wrapping

I've gone off on a new tangent...no one who really knows me is surprised! I have to have a way to make my MG cabs into pendants, after all! So I got tired of the beaded bezels which take so long (although they look so pretty!) and joined a new group on FB for wire wrapping. I've done some basic wrapping, as you can see if you browse my blog or my Pinterest page, but nothing so detailed as this! Whether my arthritic hands can handle it is another story, though!

The group, Wire Wrap Tips & Tutorials, is run by a lady named Nicole Hanna, who makes some incredible wrapped jewelry and has some great tutorials for sale, as well as a few freebies she throws in once in a while on her group. She was actually having a sale when I joined, and I couldn't help but buy several of her tutorials! One of them that I really like and doesn't take TOO long to make is a clasp that I loved - actually decided to learn to make Viking Knit to do justice to the clasp! :D I've tried Viking knit before but it never came out that great and I wasn't too thrilled with the whole process...but, it's not too difficult and goes faster than you'd think...I am still trying to get the stitches even. Once you run it through the reducing thingy though, a lot of your mistakes and unevenness just blend in...And to me, it's actually a little faster than beading....

This was the first one I made, so it is very small..a child could wear it. :D
To make Viking knit, you loop lengths of wire around a dowel or other tubular shape to make a sort of netted tube, and then you run it through a wood or plastic paddle type thing that has a succession of smaller and smaller holes. You pull your netted tube through the holes, starting at the largest and ending when it gets to the size you want. which compresses the weave and makes it more flexible, and longer and thinner. I was unsure how long it would be, after I completed it, so my first came up rather short! I understand that some folks just make as long a knitted tube as they can, when they have time, and cut it in parts later...some use shorter ones for earrings or multiple small sections for bracelets, which looks GREAT. It is hard to do colored wire though because the paddle tends to rub the colored coating off. UPDATE: Nicole has a channel/tutorial on Youtube to teach this technique...along with many others! Here is the link to her video on Viking knit and you can subscribe there as well. 

I didn't compress this one much so I filled it with turquoise chips. I made the clasp using the tutorial by Nicole Hanna.
There is a way to make the weaving more dense by weaving back over the original netting but I can't do that one yet! It's very confusing to me when I try and I get lost. Maybe as time goes on and I get better at this I'll figure it out! If you have any helpful tips on double or triple knit, let me know!

I wanted a thicker tube this time so I added more wire to make it longer before reducing and reduced it less. 

This is my first copper one. I had a hard time finding copper that was not coated so I could put a patina on it. I used 24 gauge wire, which is pretty thick for this technique! It's very hard on the hands to pull it tight and make the loops. I'll probably stick to a thinner, more easily bendable gauge of wire in the future!

This is the bracelet before patina.  Learned how to make my own end caps for these bracelets finally!
I haven't bought any patina yet, but I had a bottle of Novacan Black Patina on hand from when I did stained glass, and decided to try it on my copper bracelet and it worked great...especially considering it is at least six years old!
Here it is with patina. I found out the first wire I used to make the end cap did not take the patina at all so I had to make another set with different wire.
One thing that's very cool about Viking knit is how forgiving it is...my loops are awkward, out of line and all different sizes...but once you pull it through the paddle, it all evens out!
One more shot of my bracelet. I love how it came out!

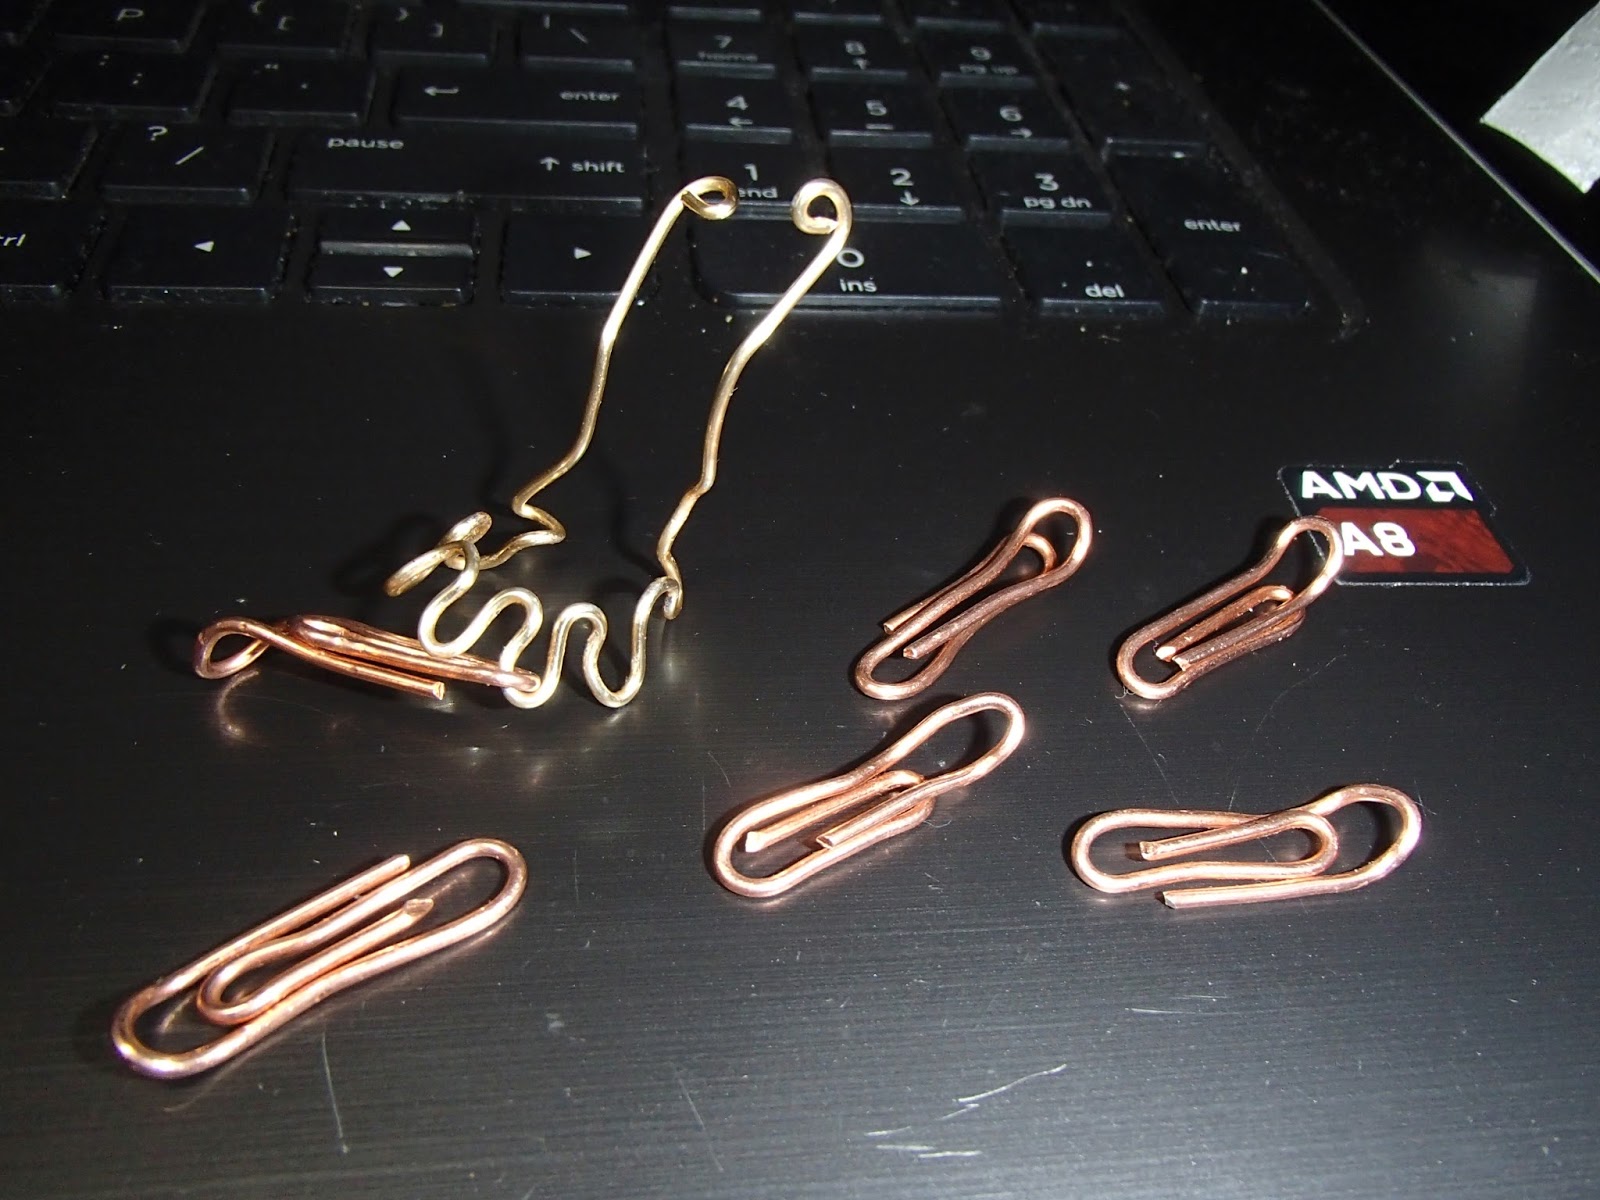
I am on a Viking Knit group on Facebook, too, and one of my fellow group members came up with a wonderful idea using paper clips and a rubberband to start the knit. Usually you make a daisy petal kind of thing with wire and add your copper or silver wire to it for your VK, then cut the daisy off. Welll,,, I am kind of a cheapskate and didn't want to make a wire thing every time and toss out all that wire. So using my group members idea, I adapted it to make a gizmo that works to get me started. I didn't have any paperclips, so I made my own out of stiff copper wire. (Probably the stuff that wouldn't take the patina above!) And I had seen someplace online how someone was using a hex key to hold their VK. I happened to have one just exactly like hers, and went to work!

Here is the hex key. It IS a little heavy. There are different sizes of these things, though...we have a whole set. I imagine you could use smaller ones to get a smaller tube...though it would be hard! Forgive my awful weaving! 
The hex key I am using has an indentation around the long end that the "doohickey" I made from stiff wire fits into perfectly, as you can see below. The hex key has six sides, which is also helpful for eyeing your loops and keeping them more even (do as I say and not as I do! I can NOT get the hang of making those loops even! I did see a video online where he takes pliers after every round and straightens up the loops...gonna try that next time!)

The loops sticking out of the top belong to my homemade doohickey, I use them to fasten it to the hex key.. The loops drooping down  below the hex key top are the doohickey's loops I hang my homemade paper clips on. Then below the paper clips, above my thumb, you can see the actual Viking knit that I made into the copper bracelet above. Notice the clips are all facing the same way...
Below you can see my homemade paper clips and my doohickey. :) I made it with round nose pliers and some stiff wire. The loops sticking up are to fasten it sort of like a safety pin in that I can open and close to put it on the hex key...the loop from one side (sticking up) hooks into the other side and makes a complete circle. This is not a tutorial but you can hopefully see how I made it here.

I bent the paperclips end to make it easier to placing the knitting wire on for the first round. I put them on the doohickey all facing the same way, with the outer pointed end UP so I can slip them off the weaving after it is stiff enough to hold onto the hex key by itself.
That's about all I have to say about my doohickey and VK...other than that you might like to try making one of your own if you like to Viking knit. It isn't permanent but if it breaks you can always make another. :)

Viking knit isn't the ONLY thing I've been doing. I have been learning a lot of techniques for wire weaving from various sites on the internet, and one I've learned a lot from is CSL Designs on Youtube. The woven bracelet is from a tutorial she taught. Love her accent, too! 
Just a simple clasp on this one...mostly because it got kind of big! :D
This cross is based on one of Nicole Hanna's tutorials. It is pink coated copper wire with a glass bead.


Then I cheated a bit by just drilling a hole in some of my cabs and using a pinch bail. :)


This is a five strand braided bezel on one of my Mokume Gane pendants (based on Marilyn's tutorial, of course!)...I got this bezel tutorial from CSL Designs again! She has such great ideas.....
The agate donut below I've had for ages. I got a tutorial from Shaktipa Designs that I had seen someone on one of my groups use and I had to purchase it! My rendition leaves a LOT to be desired though! It's a first try, what do you expect? :D Turns out it was my second purchase from her; I had also purchased her Soutache tutorial, too!

This bail was patina'd.
I also did SOME beading recently, with the other donuts that I've had forever! This time I used some Super Duo beads I got at a local beading store...they just aren't available near me!  #SupportLocalShops   I saw a bracelet someone made with Super Duos on one of my groups and thought it would be perfect for a bail.                                     
This one is beaded with Super Duo beads.

This one was beaded with Twin beads. I like the Super Duos better but the copper are the only color I have and I wanted to see how these did...:) Not that great, lol!
And last, but not least, here's another necklace I completed recently. It is one of my favorite Mokume Gane polymer clay cabs, wrapped in satin brass wire. Brass is very difficult to wire wrap with, and let me tell you, my poor hands know all about it! :) I found the tutorial to wrap the cab online at CLS Designs...love her stuff! I think, now that I know how, I have to go make some end caps for this necklace! Cya! If you have any questions about anything, leave me a comment!


Now you know what I've been doing lately! Let me know what you think in the comments! And make sure to stop by my Pinterest page to see a lot more of my creations, and please give my Facebook page, Karmic Confetti, a like - I just need a few more to reach 100!