Showing posts with label clay blade. Show all posts

Saturday, May 2, 2015

A Clear Winner in the Polymer Clay Slicer DIY

I've been very busy with work and other projects but that doesn't mean I haven't wanted to post some of the things I've been doing! I had a previous post about a polymer clay slicer I made from parts from the hardware store. I haven't used it much because I've had so many  other things going on and besides, I really wanted to make one I had seen a few weeks ago. 

I've seen a lot of homemade slicers that I liked recently, for instance, I really like this one (seen below), but I'm having a hard time finding a metal slinky! I don't know if you could find one in a store, new! I thought there was some kind of safety issue with the metal ones...anyway, all I could find were plastic ones. This seems like you could control the thickness of your slices very easily, but of course that's just a guess until I make my own! :)  It might be rather limiting as far as what size cane would fit inside this contraption, though.


Then, there is this one at Kater's Acres.  I really like the design but I think it's a little more than I need for the few canes I have to cut!  At the time of this writing, i don't think she has a tutorial for it, anyways, and it looks pretty complicated! Like a Cadillac of cutters! :) Her father made it for her...what a wonderful dad! 


Then there is this one, simple and practical, by one of my favorite bloggers, Meg Newberg. Waste not, want not...although I've never had any clay go to waste, have you? :D It would take up quite a bit of room, though, for something I don't use that often.


And after re-reading Meg's post about weight, I may have to modify the one I came up with, based on a beautiful idea from France. Isn't it elegant? Mine is not nearly as well made as this one! But I did not want to spend a fortune on it, either...


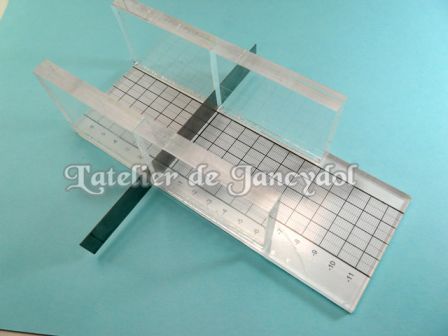
Still, I am very happy with the result, below. :) I got the three sides, which are acrylic stamping blocks, from Joanne's, for $1.50 each. I cut one in half, with my rotary tool. That was interesting! The bottom ruled acrylic square is a 4" ruler from Walmart and cost $4. I got some two part epoxy from Harbor Freight for a couple of dollars to glue it together with, and I already had a a clay blade, although I think I need a new one as this one has a bend in it! After reading about slicers moving while trying to use them, I may add some suction cup feet to the bottom of this one to stick to the stovetop or my glass table...This system holds the blade nice and tightly, though, and you can put the clay cane on a sheet of plastic to move it back and forth easily for slicing. It is easily modified, if you wanted to make your own...just use larger blocks than I did. This one measures less than three inches high, so if you needed something larger, the base would have to be bigger, as well. As I said, I don't have large canes to cut, nor very many, very often, so this one is perfect for me! It doesn't take up much room, either.


Oh, and pardon my stovetop. At least it takes a good picture, even if it doesn't get used very much. :D


Monday, April 6, 2015

Homemade Polymer Clay Slicing Gizmo for about $10!

Well, I am VERY excited. I've been thinking about making my own slicer for a few weeks now. I had seen a beautiful one made from lucite stamping blocks and a ruled lucite sheet, which I sort of based my idea on. I couldn't find the lucite blocks cheaply that were large enough and my basic idea was to make a U-shaped open ended box like shape that would hold the slicing blade perpendicular to the cutting surface and make it easy to slide the clay canes back and forth. 

We've got some home projects going on and so I was putzing around Home Depot the other day and saw these things called "tie plates" meant to tie wood planks and the like together. basically a large sturdy metal plate with holes to drill through to attach it to the project. I realize that could be a strong base so I bought a couple - they were inexpensive, under $2. I got two different sizes, too. Next, I need the uprights to hold the blade straight up and down. I decided shelf brackets would do the job. Sorry that I don't have a separate picture of them but I had already attached them by the time I decided this was going to work! I originally thought I would screw them down to the holes in the tie plate but then the screws would have gotten in the way, and the holes didn't line up right either. So duct tape to the rescue!

Below you can see the ingredients and the ugly base. I used my favorite Gorilla duct tape to attach the four shelf brackets to the bottom plate, but you could probably use silicone caulk or hot glue, too.  I think this is actually stronger, though! You can see that mess in the second picture. I taped the brackets to each other and then to the plate. It doesn't sit completely flat but it doesn't matter....

The bottom plate I chose because I was going to use a 4" tile to put the clay canes on and that was a good size, but I ended up going a different way. In the photo below you can see the pre-cut sheet metal I ended up using instead. Much lighter in weight, cuts with sturdy scissors and slides nicely over the metal tie plate. You also get ten sheets in the package so you can make more than one for your clay slicer. There is no reason you couldn't bake on these sheets, or use them to store clay on. I also included in the photo a couple other sizes of tie plates, so you can see you aren't limited by the size I got. The shelf brackets can be purchased in other sizes, too.  And you can buy a big roll of sheet metal, if you think you're going to use a lot of it! I love that stuff...:) I use these pre-cut ones a lot. They are a little thicker than a soda can and die cut, cut, and emboss nicely.


I began by taping the four brackets to the base. I overlapped the brackets so they'd fit tightly against the sides of the tie plate base and then taped them to it, leaving a thin gap between each of the side brackets so I could fit my clay blade in there. (Shown below on its side. It's really not pretty under there!) I was going to use my regular Sculpey blade but then I had an idea to use the sheet metal to make a NEW blade. This turned out to be a brilliant idea! :) It makes the blade taut, is actually a bit sharper than my old blade, and kind of holds everything tight while slicing.  I just used the slice I cut off to make the bottom fit the tie plate with some metal scissors I have, and used some round nosed pliers to make round ends to both hold it with and slide up and down in the contraption. (See the bottom picture.) You can adjust those rounded ends to make it hold tight in your own clay cutting gizmo.


So, to use this thing, you put the clay on the metal sheet, which I cut to fit tightly on top of the tie plate base and between the shelf brackets. It slides easily back and forth so you can slice the cane. I could've/should've gotten all the same size shelf brackets but I went this way instead. :) It's all tight enough that, as you can see in the photo, it holds the blade up until you press it down. I can also still use my Sculpey clay blade if I wish, or the rippled one, etc. No measurements, but you can eye it out, right? Or if you have ADD, you can use a scribe and a ruler to make markings of your own on the soft aluminum. And you can use a larger plate to make yours, if you need one (as seen in the picture at the top), since you are making your own blade with the sheet metal and it can be longer, if you wish! This one is good for me, though. :) I bet you could even make your own rippled blade if you have a decent metal paper crimper...:)

It's not even THAT ugly! Kind of industrial looking. You could even decorate it with clay if you want it prettier!  And of course, the best part is it was CHEAP. The package of 10 pre-cut sheets of sheet metal was under  $3. The metal tie plate was around $2. The brackets were the most expensive part and I am sure I could have gotten them cheaper! The two thinner ones were under two and the other bigger ones were a couple of dollars more because I got them in a different area and didn't realize how much more they were...Anywho, this thing cost about ten dollars! With lots of left over sheet metal...I have another project I'm going to share soon that will show you some other creative ideas to use those for! :)

In case I haven't explained it well...The picture above shows the rounded ends of the metal blade I made, slipped between the shelf brackets on the right and left. The shiny sheet metal on the bottom is where you put your clay, and it slides back and forth on the bottom tie plate. There is no way to cut a round cane, yet, but I'm working on it! I thought about using the Playdough again but it's not stiff enough to really support the cane so it will keep its shape. 

I hope this gives you some ideas, at least, and if you decide to make one or have any questions or tips about this one, let me know! Thanks for looking. and make sure to stop by my Pinterest page to see a lot more of my creations, and like my Facebook page, Karmic Confetti