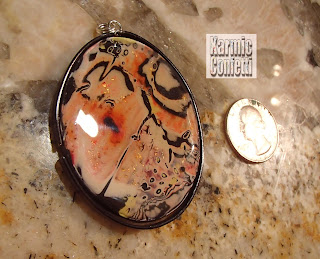
I got inspired by a post on my polymer clay Facebook group about a Mokume Gane technique by Marilyn Knopic. I had to go search out her blog to learn it....here is the link!
I haven't been so happy to learn a technique for PC in a long time! Here are the pictures that explain why :D There are many more, but these were my favorites! I used one block each of black, white and transparent...and a whole lot of other clay to layer the Mokume Gane on! Probably 6 additional blocks! Whew....lots of sanding! And after doing all that sanding...I will just stick to Magic Glos!
A word about the first picture...the bezel is not attached yet, but you get the general idea. I have been doing so much sanding and buffing I didn't get that far yet but I will soon! But the colors...!
This is my first wire wrapped one. Been so busy with the Magic Glos I haven't had time to do more than this one so far!
These may seem a little large but I wanted them to be statement pieces.
This one reminds me of the pictures of the Painted Desert I've seen. I also get a zebra vibe, some how! :)
Aren't the colors luscious? I love alcohol inks! Gotta work on this bezel, too...
This is one of my favorites. The back is as nice as the front. The "front" is not Magic Glos, btw. It is Liquid Kato Polyclay. I love the gloss that liquid PC has! But I do like the MG better...it just doesn't do well on curved surfaces! I sanded this side, all the grits I had!
This is the reverse side. Since it was flat, I used the MG...love that glossy shine! No sanding needed, either!
They are all so different, and yet come from the same MG batch...
This one reminds me of modern art...pop art? This is a smaller cab.
These three were done with a different technique. I cut them with a larger circle cutter. Then I draped them over the back of a smaller cutter and made sure it was securely stuck to the cutter. Then I flipped it over onto another piece of clay and cut them both out, capturing air in between, so it is hollow. Kept their shapes nicely! AND bonus...for some reason, when I did my sanding and sanding and sanding (grits 220-400-600-800-1000-1500-2000-2500), and then buffing with the Dremel - these came out SO GLOSSY. Didn't need a finish at all. I have several others that had the exact same treatment and weren't nearly as shiny! But dang, my hands are so sore today...it stinks having arthritis and making clay some days!
And one last technique I tried with these beads...I used a slice of copper pipe as a bezel. I saw someone else use it and thought it was genius! Perfectly round and sturdy as heck! I can even solder connections to it....Great idea, no? To use the Magic Glos on it, I had to seal the edge or it would have just run out between the clay and the pipe slice.. I tried to keep it tight but I believe it must shrink a bit while baking...anyways. I decided to use the Liquid Kato Polyclay on it to seal the edge, because these were rounded and we all know you can't use Magic Glos on a curved surface! And it sealed the bead inside the pipe so then it was just a matter of using MG on the other side. Came out just as I wanted!
Thanks for looking - make sure to stop by my Pinterest page to see a lot more of my creations, and like my Facebook page, Karmic Confetti!


All I can say, is WOW!!! love the colors you chose for the stack here . . . . awesome work!!! and thank you for the kind words :) keep it up!!!!
ReplyDeleteThanks so much, Marilyn! i didn't use any blues or greens...I've been on a fire kick lately and I tried to use all reds, oranges and yellows....sure made a beautiful cane! I think next time I make it I will add additional gold leaf...I may also have rolled it through the pasta machine one time more than you do in your tute. I am so glad I saw your tutorial and thanks for putting it out there! -K
DeleteGreat colors!! My fav is the last oval, it looks drawn.
ReplyDeleteThank you, Monica! I almost feel I can't take any credit for it...the clay does it all by itself. But without Marilyn's technique, it would be nothing! :D I just made a green/blue batch that I'll be posting in the next couple of days. Stay tuned! :D
Delete