Saturday, May 30, 2015

And now, for something completely different....(Pebeo Prisme & Moon)

Playing with my Pebeo Moon and Prisme paints again! I really never stopped, I have just been waiting for them to cure completely before trying to put Lisa Pavelka's Magic Glos on them to protect the paint. I redid a few of them, too so double the wait...But I finally took a break from the glass fusing to do this now that a few weeks have gone by. I have so much mica and glitter floating around my house that I don't think I can use my ICE Resin anytime soon! And someone just told me the stuff has a shelf life...and I've had mine for at least a year! Sigh...Anyways, on to the creations! :) 

These are several different colors. I'm afraid I couldn't tell you what they are, though! I am sure it is the English red, the Onyx, Eggshell White, Violine and probably the Moon  Gold.


I like the way the cross came out. Same colors, probably Carmine and Vermillion in addition.


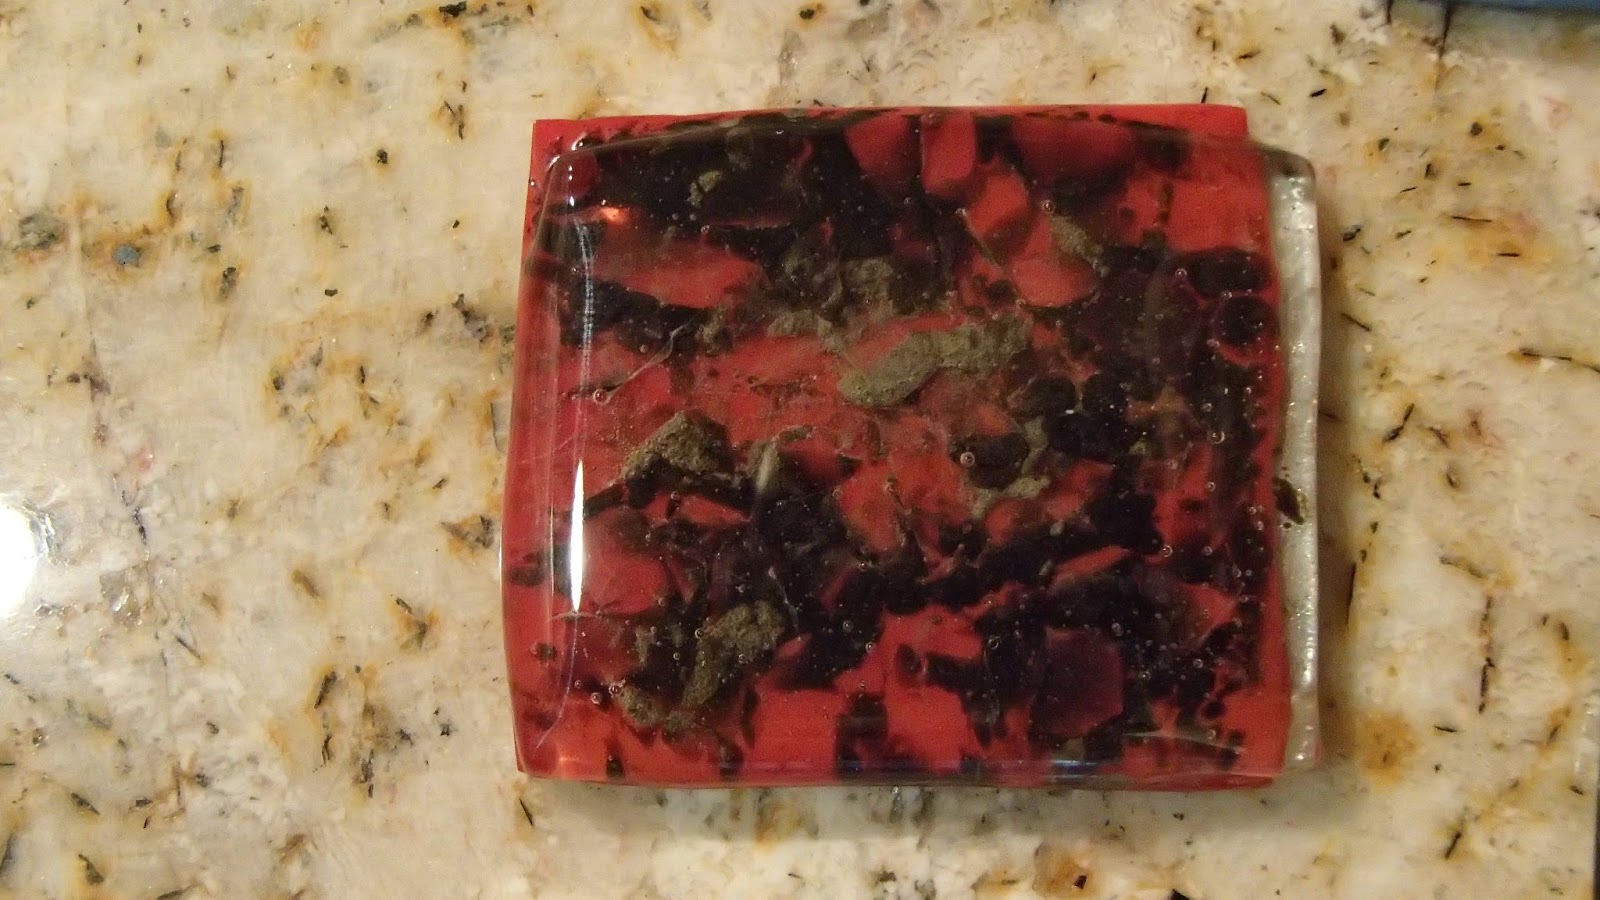
On this one and the one below, I added some Super Copper mica powder to it. It came out very metallic looking.


Then I started playing around with some Formica samples I had. Love the way the colors combined! You just never know what you're going to get, with this paint! These are not sealed yet.


Then I thought to add a fairy charm I had on hand. I ran out of Magic Glos on this one! I'll have to get more and figure out how to finish it. I had been trying to get a flame effect in the paint.


 The Magic Glos is so clear you can't even see it in these photos. :)


This is the first side...I see a flower.


And the reverse side. Kind of like a Phoenix in the flames, eh?


 First side....Volcano? :)


Reverse,,,View inside the volcano? Hehe. 


Then I bought a couple of paper mache boxes to experiment with. I love the way they came out! I was trying to do flames again, on most of the sides....


These still haven't been sealed. Maybe that's when I'll try the ICE resin...


This one was interesting, the way it came out. I put a couple of tiny droplets of paint and it must have had a lot of the stuff in it that makes them move and it spread out like crazy!


Similar thing happened to this box, as well. Stir, stir stir! I thought I did....


And then, a different project. This is a piece of chainsaw art my husband and I bought in St. Augustine about a decade ago. It's been hanging outside for ages and we discovered the back of it was very rotted. It has some sentimental value to us, so I found a product to reinforce the wood and it did a great job! It's a liquid that soaks into the wood fibers and makes them strong again. I then filled all the cracks with wood filler and repainted it. What a mess it was!


 Ta da! I was very happy to see it back almost better than new! I decided to try my Pebeo paints on  the turtle...


Pictures don't really do it justice! Very happy with the way it came out. I'm still waiting for it to cure completely and then I'll give it a clear coat...

Closeup of the shell. Aren't the effects lovely! Love this paint...!


Thanks for looking - make sure to stop by my Pinterest page to see a lot more of my creations, and like my Facebook page, Karmic Confetti

Thursday, May 28, 2015

I Ain't Lion (Glass Engraving)

Been having fun with my newfound hobby - glass engraving. I decided to fuse a glass blank and use my rotary tool to engrave it. It didn't show up well so I used some black paint and rubbed it into the engraving.. It's okayyyy....but meh. 


Then I found some clear stained glass I had put away and went to town! This lion is freehand, and my very first attempt. I actually drew it on paper first and then used it as a guide beneath the glass. I wanted to make sure his eyes were straight and the face wasn't lopsided, as in some of my sgraffito attempts!  There's a lady named Lesley Pyke who has a video on Youtube of her engraving a lion on a Tudor leaded glass mug...It is AMAZING. So that video was my inspiration, and  I really liked the way it came out...at first....for a first attempt, at least! I have some rubber polishing inserts for my rotary tool that allowed me to do some basic shading around his mouth and in his mane. I must get more! :)


I started looking around on the internet at tiger pictures and got a bright idea...why not use a better picture underneath the glass to work from? I don't know whose work this is, but it's really lovely...


This is the result. I finally got it through my head to only engrave the light areas of the picture...:)  It probably needs a little bit of tweaking, yet but - I am very happy with the way this one came out!


Thanks for looking - make sure to stop by my Pinterest page to see a lot more of my creations, and like my Facebook page, Karmic Confetti

Monday, May 25, 2015

Tiger, Tiger Burning Bright...(Glass Fusing & Mica Powders)

I have been on a tiger kick lately. No particular reason why.. I just like 'em and they aren't too difficult to sgraffito! :) Still doing my mica powders and fusing...just used up the last of my black scrap COE 96 tonight. The ones below are my first attempts, from left to right. 


This one didn't actually make it to the fusing stage...he was a little too crazy eyed! First attempt at drawing a snarling tiger. :D There are some amazing artists on Youtube sharing their techniques and I was attempting to copy an artist named Alphonso Dunn (see the tutorial here). The nice thing about doing the sgraffito before its fused is that you can wipe it off and start over...:)

\\

He also inspired me to try an eagle.  But this post is about tigers! :)


These two are much better. Practice makes perfect! I was happy that I didn't need to grind or firepolish the one on the right.


This guy did make it to getting fused, below. 


He hasn't been ground and firepolished yet but I'm happy with him!


Next, I decided to do a 3/4 view.  I'll probably repost his photo after I get him ground and firepolished.


Then a friend gave me some old bottles and I decided I needed a bigger canvas. :)


He sort of came out like a negative, so I took the photo into my graphics program and made it into a negative to see if it showed up better. 


I was worried about doing a rounded shape but I didn't slip. I wasn't using my rotary tool...I was using a much less powerful battery operated engraving tool. 


On the back, I tried to make one of those one stroke flowers with my engraving tool. Not too successful but it was my first try. :) With sgraffito, you are basically scratching the outlines of your picture into your glass. That's why I like using black glass...the scratched lines are black and outline your drawing nicely....like drawing with a dark pencil on white paper. But on the dark bottle, my tiger above looks like a negative. The parts I etched became lighter.  I watched this wonderful glass engraver named Lesley Pyke (see her amazing work here) and she talks about engraving the light. After trying to etch the flower, I understand that statement now. 


Then I tried a bottle that was sort of etched already. It wasn't shiny, in other words... The engraving didn't show up very well. I ended up using paint to rub into the etching to show it up more. It left a gold mica tint in the etching.


Then I bought a small red bottle with three flat sides. I really like the way this one came out! I think I see an improvement over my first few attempts, anyway! What do you think? 


Side two of the red bottle. Couldn't/didn't do the third side, mostly because there is a large seam running down the center of it. I may still do something with it, not sure yet. 


Thanks for looking and come back soon!


Saturday, May 16, 2015

Poor Man's Etching (Glass Fusing & Mica Powders)

Warning: This post has a TON of photos! :) Not too long ago, I found out you could use Versamark, rubber stamps and mica powders with fused glass in my microwave kiln (mwk)...AKA "Poor man's etching", I fell in love with the technique and have used it extensively over the last couple of weeks. I got a deal on one of my FB groups to buy/sell glass and other fusing stuff and got three pounds of black 96 COE scrap very cheap. It is my ONLY 96 COE glass so I haven't been able to use it with any of my other glass....so I got stamping to jazz it up a bit! I had recently purchased some tree stamps and loved the way they look as a pendant. The tree below was done with three different colors of mica powder - blue, pink and green. I found the coolest bail for it, that looks like a tree, too. :)


Back of tree pendant with tree bail.

Then on one of my other FB fused glass groups, a gentleman made the most amazing fused glass panel by etching black backed dichroic with a rotary tool, so I decided to give it a try.  I've also been fascinated by the MUD technique by Margot Clark (link leads to her Pinterest board, some lovely examples of her work!), and have been trying to emulate it with other methods and tried etching a flower into the blue pendant pictured below. It came out a little dark but is a gorgeous color blue!

Then I got inspired and tried making a flag for someone special using a red background and white premade stringers with some dichroic. It came out really cute!


Another tree. This pendant showed me that I could add the mica on the firepolish firing. I wasn't happy with the red pendant - an attempt at the "bubble technique" taught by Tanya Veit...if you don't know who she is, go watch some of her Youtube videos on glass fusing, immediately! She is so talented and teaches such cool stuff. Anyway, I got some kind of devit or something in this and wasn't happy with it. 

Bubble Pendant before - showing devit?

I stamped it with the first tree stamp I had and still wasn't satisfied...(the one on the right in the photo has musical notes behind the trees...it's called Tree Song.)


Then I got a new tree stamp and tried restamping it and fire polishing it again. Surprisingly, it took! I'm very happy with this one. I have since learned that I could have ground off the original tree that I stamped at first and then restamped, but fortunately the first stamp doesn't show through this tree. 


More stamped pendants...this one with dichro.


This is more of my 96 COE glass.


Then I got on a sailboat kick. Don't ask me why. :) 


This one, I etched some birds flying into the sun. Somehow I got fish flying over the sun, as well. :)


This one is kind of plain but its the only one I used a pinch bail on....


 Then I pulled out my Asian stamps. Really happy with this one. :)


This one came out okay too. :)


 I got some cool tiny stamps of deer to go with the trees and got inspired with talk of landscape canes on both my polymer clay and glass groups, recently, so I made some tiny landscapes.  These deer are supposed to be standing by the dichroic water, at any rate. :)


This one was more of an Alpine feel but I wasnt' entirely happy with the result, so I restamped it with the light pink mica. Can you see the tiny millefiore flowers at the bottom? :)


Another sort of Alpine setting, with a sunset. :)


Deer at night. :D Found this Pearl Ex mica powder called Citrine that is so pretty fired! I think the Pearl Ex shows up better than the Perfect Pearls I've been using. I would love to find some black mica....I think that is next on my to-do list! If anyone knows any good suppliers, let me know in the comments!


More deer with a dichro moon. There is a tree in the background, as well. "Ghost Tree".


 I wouldn't say I got carried away making these stamped deer/moon landscapes, but....


Okay, I did. :D This is still just SOME of them...lol.


Then I found out about something called Sgraffito. (See why I love that Citrine? Looks like real gold, even fired on the bottom of a piece!) Sgraffito is scratching into a surface to reveal the color below. So, I covered the bottom glass with Versamark, dusted with Citrine, and scratched the name into it.


Tried doing it with this one. Not that great but it was my first one! :)


I then figured out I could combine the sgraffito with my stamps to make them look more detailed...or fix them if they didn't stamp perfectly...I added some detail to the palm tree and scratched waves into my "beach" background...


So, I have to finish this here....been trying to for a while now but I keep making more I want to put in this post!  I hope I've given you some ideas and some inspiration! And if you would like to purchase anything you see on my page, contact me! Thanks for looking and make sure to stop by my Pinterest page to see a lot more of my creations, and like my Facebook page, Karmic Confetti