I've been very busy with work and other projects but that doesn't mean I haven't wanted to post some of the things I've been doing! I had a previous post about a polymer clay slicer I made from parts from the hardware store. I haven't used it much because I've had so many other things going on and besides, I really wanted to make one I had seen a few weeks ago.
I've seen a lot of homemade slicers that I liked recently, for instance, I really like this one (seen below), but I'm having a hard time finding a metal slinky! I don't know if you could find one in a store, new! I thought there was some kind of safety issue with the metal ones...anyway, all I could find were plastic ones. This seems like you could control the thickness of your slices very easily, but of course that's just a guess until I make my own! :) It might be rather limiting as far as what size cane would fit inside this contraption, though.
Then, there is this one at Kater's Acres. I really like the design but I think it's a little more than I need for the few canes I have to cut! At the time of this writing, i don't think she has a tutorial for it, anyways, and it looks pretty complicated! Like a Cadillac of cutters! :) Her father made it for her...what a wonderful dad!
Then there is this one, simple and practical, by one of my favorite bloggers, Meg Newberg. Waste not, want not...although I've never had any clay go to waste, have you? :D It would take up quite a bit of room, though, for something I don't use that often.
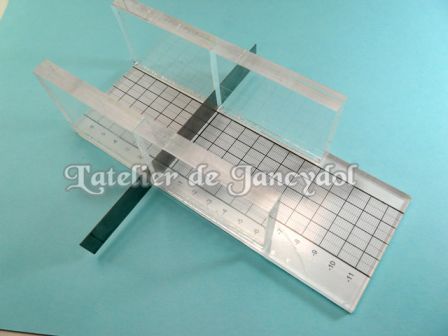
And after re-reading Meg's post about weight, I may have to modify the one I came up with, based on a beautiful idea from France. Isn't it elegant? Mine is not nearly as well made as this one! But I did not want to spend a fortune on it, either...
Still, I am very happy with the result, below. :) I got the three sides, which are acrylic stamping blocks, from Joanne's, for $1.50 each. I cut one in half, with my rotary tool. That was interesting! The bottom ruled acrylic square is a 4" ruler from Walmart and cost $4. I got some two part epoxy from Harbor Freight for a couple of dollars to glue it together with, and I already had a a clay blade, although I think I need a new one as this one has a bend in it! After reading about slicers moving while trying to use them, I may add some suction cup feet to the bottom of this one to stick to the stovetop or my glass table...This system holds the blade nice and tightly, though, and you can put the clay cane on a sheet of plastic to move it back and forth easily for slicing. It is easily modified, if you wanted to make your own...just use larger blocks than I did. This one measures less than three inches high, so if you needed something larger, the base would have to be bigger, as well. As I said, I don't have large canes to cut, nor very many, very often, so this one is perfect for me! It doesn't take up much room, either.
Oh, and pardon my stovetop. At least it takes a good picture, even if it doesn't get used very much. :D


That metal slinky could be a memory wire ring base.
ReplyDeleteThat's a great idea, although I would think you'd have to use a bracelet memory wire for the space! I have since found a metal Slinky at Michaels, of all places, on clearance! I haven't tried making the slicer out of it but I just got it. I'll keep you posted if I try it! :)
Deletegreat ideas Karma :) I like the last one myself!
ReplyDeleteThanks, Marilyn! I have an update to this post showing the slices...very even and thin. :) It will have to wait till after this weekend, though! Happy 4th!
ReplyDeleteI think your slicer is perfect! What a smart idea to just use a piece of plastic to slide the cane forward. I may have to try this, thanks for sharing!
ReplyDeleteIt works really well, I hope you can share when you make one! I'd love to see it...Gonna try to put the photo here of my slices with it...cross your fingers. :D http://3.bp.blogspot.com/-er_LVN1q-Bw/VbEfcRS6fuI/AAAAAAABI4Q/l3jIA7zGTxA/s320/P6272649.JPG
DeleteThank you so much for the idea :-) I have just shown my Dad and he thinks he can make me something along the same lines but a lit ting bigger for my marbled clays that I love to make :-) this will make slicing them a lot easier that's for sure :-)
ReplyDeleteKatersAcers has a tutorial for hers. I am gathering supplies, I would like to make an acrylic one as well
ReplyDeleteKatersAcers has a tutorial for hers. I am gathering supplies, I would like to make an acrylic one as well
ReplyDeleteThanks for the comparisons and your notes. So many of us are looking for a way to cut repeated equal sized slices, with something that doesn't take up much room.
ReplyDelete